Contents
- 1 From Idea to Live Website in Minutes: My Hands-On Test of the WordPress.com AI Website Builder
- 2 Introduction
- 3 Step 1: Open the WordPress.com AI Website Builder
- 4 Step 2: Describe the Website I Want
- 5 Step 3: Choose the Tagline
- 6 Step 4: Watch the AI Build the Website
- 7 Step 5: Understand the Editor and AI Sidebar
- 8 Step 6: Use Good Prompts When Editing
- 9 Step 7: Customize the Homepage
- 10 Step 8: Launch the Website
- 11 Step 9: Upgrade to Connect My Domain
- 12 Step 10: Update and Finalize Images
- 13 Step 11: Adjust Design and Layout with AI
- 14 Step 12: Create Additional Pages
- 15 Step 13: Enable and Use AI Tools Across the Site
- 16 Step 14: Add Ecommerce Later if Needed
- 17 Who Should Try This
- 18 Final Thoughts
- 19 🎬 Watch the Full Video Tutorial
- 20 Frequently Asked Questions About AI Website Builders
- 20.1 What exactly is an AI website builder?
- 20.2 How does an AI website builder assist with designing a website?
- 20.3 How is an AI website builder different from a traditional website builder?
- 20.4 How long does it usually take to create a website using AI?
- 20.5 Can you still customize the website after the AI generates it?
- 20.6 What types of websites can be created with an AI website builder?
- 20.7 Is it possible to start building a website with WordPress.com AI for free?
- 20.8 Are ecommerce websites supported by the AI builder?
- 20.9 Can you use your own domain with an AI-generated website?
From Idea to Live Website in Minutes: My Hands-On Test of the WordPress.com AI Website Builder
📌 Note for Readers
For this step-by-step tutorial, I’m using my own domain AffiliateGuide.in to show you how to build a website with the WordPress.com AI Website Builder. Whenever you see AffiliateGuide.in in the screenshots or examples, simply replace it with your own domain name.
Introduction
In this guide, I will walk you through how I created a complete website using the WordPress.com AI Website Builder. I will explain the process exactly as I experienced it, step by step, as if you were sitting next to me while I build the site.
If you want more ideas on how to write better prompts for AI website builders, see this guide on AI website builder prompt examples.We will start with the very first prompt and move all the way through editing text, changing images, adjusting the layout, creating pages, and finally launching the website.
You can follow these steps whether you are using the free trial or a paid plan such as Personal, Premium, or Business. The only difference is that the free trial keeps your site in Coming Soon mode. A paid plan allows you to connect your own domain and make the site public.
If you’re new to AI website builders, you might also find this beginner-friendly guide helpful: Getting Started Without the Overwhelm: Building Your First Business Website With the WordPress.com AI Website Builder .
Step 1: Open the WordPress.com AI Website Builder
I begin by opening my browser and going directly to the AI Website Builder.
I type the following address into the browser:
wordpress.com/ai-website-builder
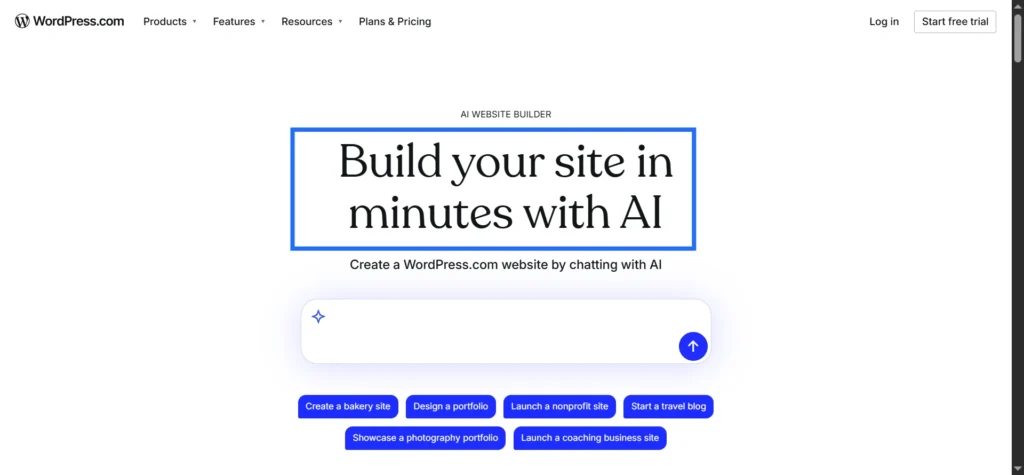
The page loads with a large heading explaining that I can create a full website using AI without coding or design skills.
At the center of the page I see a chat box where I can describe the type of website I want to build. This chat box is where the entire process starts.
Step 2: Describe the Website I Want
Now I type a short description of the website I want to build.
For this example, I type something like this:
“Affiliate marketing education website for beginners in India with guides, reviews, and blog posts using a clean and professional style.”
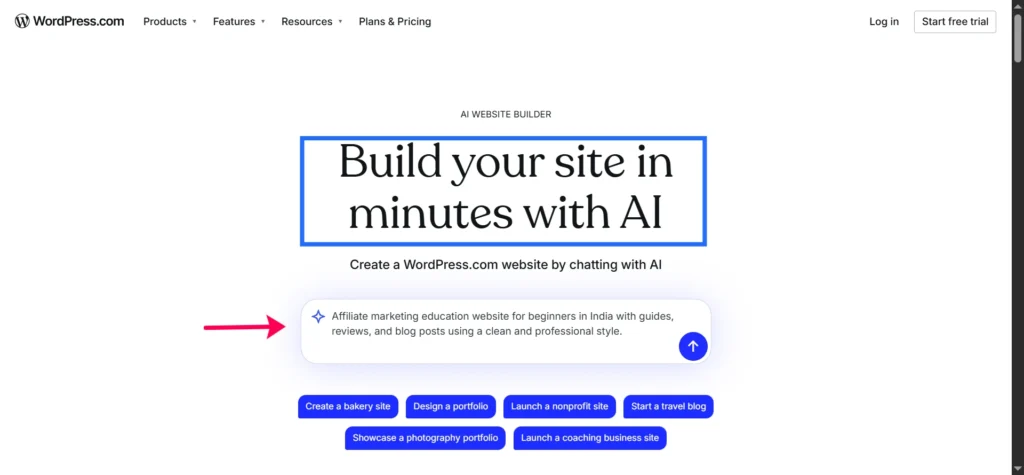
I press Enter to submit the prompt.
If I am not logged in, WordPress.com asks me to log in or create an account using my email. After logging in, I am returned to the same AI chat and my prompt is still there.
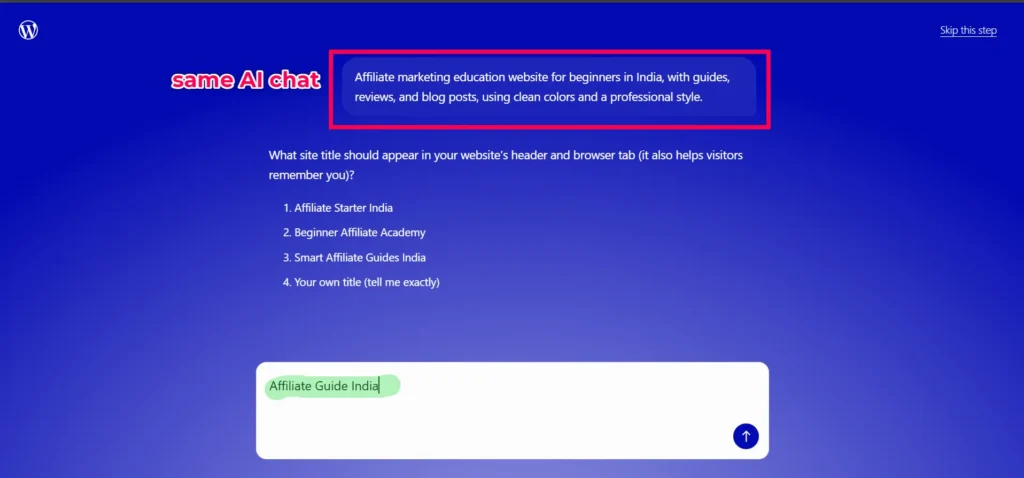
Step 3: Choose the Tagline
During the setup, the AI suggests a few tagline options that will appear in search results and social media previews.
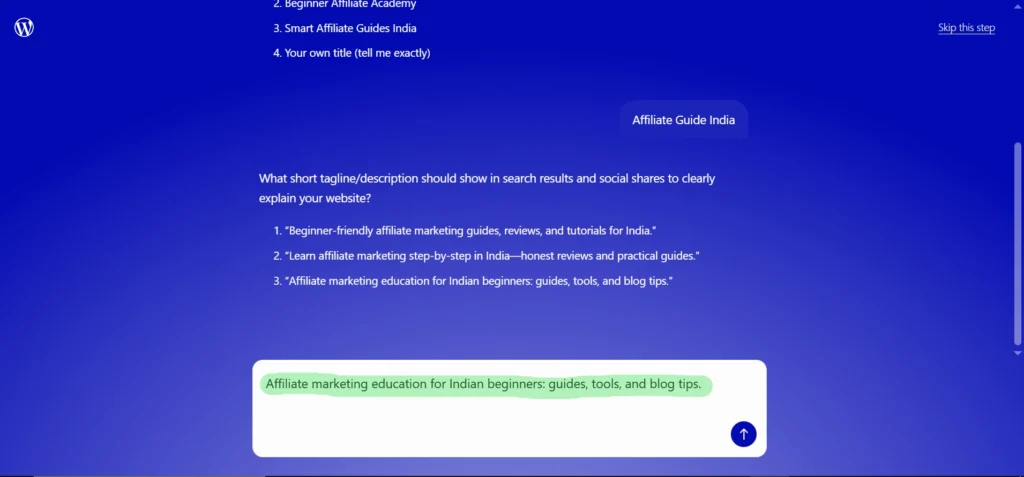
I choose option 3: “Affiliate marketing education for Indian beginners: guides, tools, and blog tips.”
• This option works best for a few reasons.
• Clearly mentions Indian beginners, which matches the target audience.
• Includes guides, tools, and blog tips, accurately describing the type of content the site will publish.
• Uses wording that sounds professional yet beginner friendly.
• Fits well within the recommended search result length (under 160 characters).
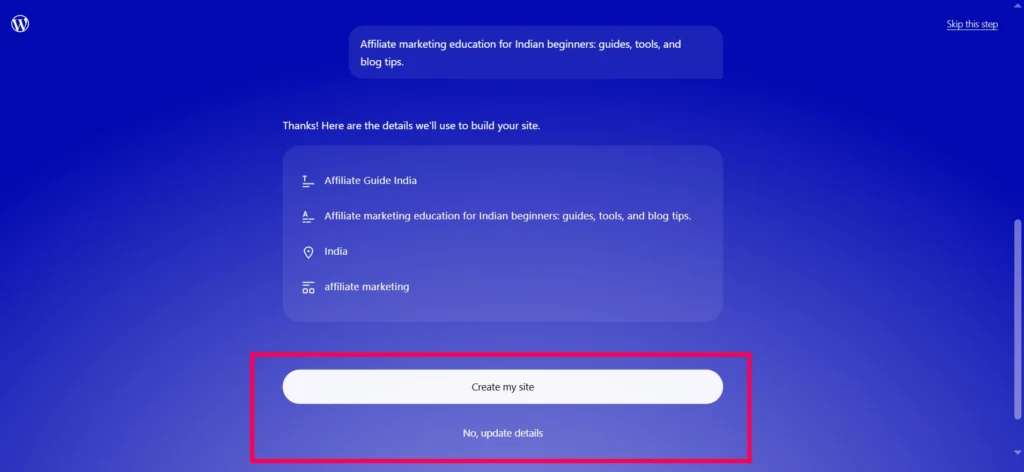
When the AI has gathered enough information, I see a button labeled Create my site. I click that button to begin the automatic website creation process.
Step 4: Watch the AI Build the Website
Now the interesting part begins.
The AI starts generating the website automatically. I can watch as it creates the layout, content, and images in real time.
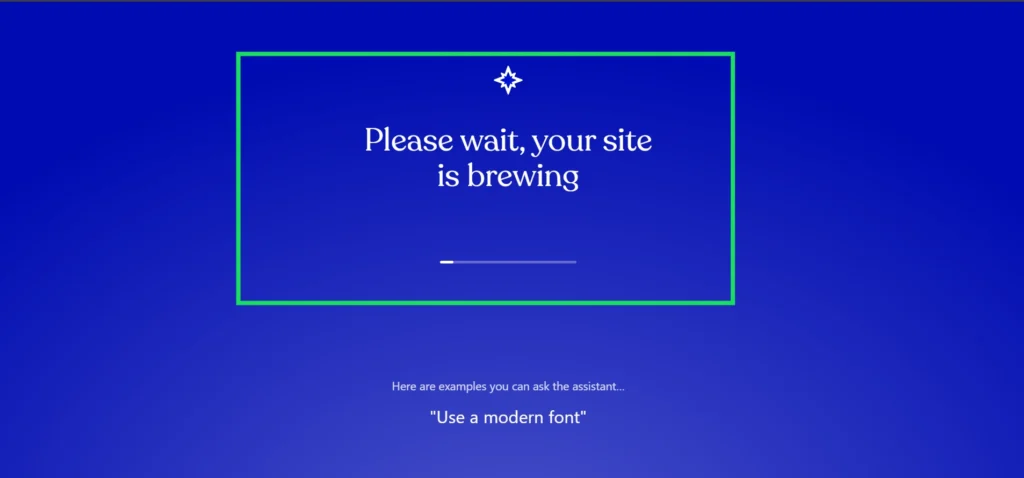
While it builds: Grab a coffee ☕ – it works automatically.
This is what happens in this stage:
- The AI creates a homepage layout that matches my niche and goal. It adds sections like a hero banner at the top, information about me or my brand, services or features, testimonials, calls to action, and a footer.
- It suggests images that fit the topic, such as business scenes, office photos, or relevant visuals.
- It fills the site with placeholder text that matches my description, such as short introductions, section headings, and sample paragraphs.
- It may also create additional pages, like a blog page, contact page, or any other pages that match the type of site I described.
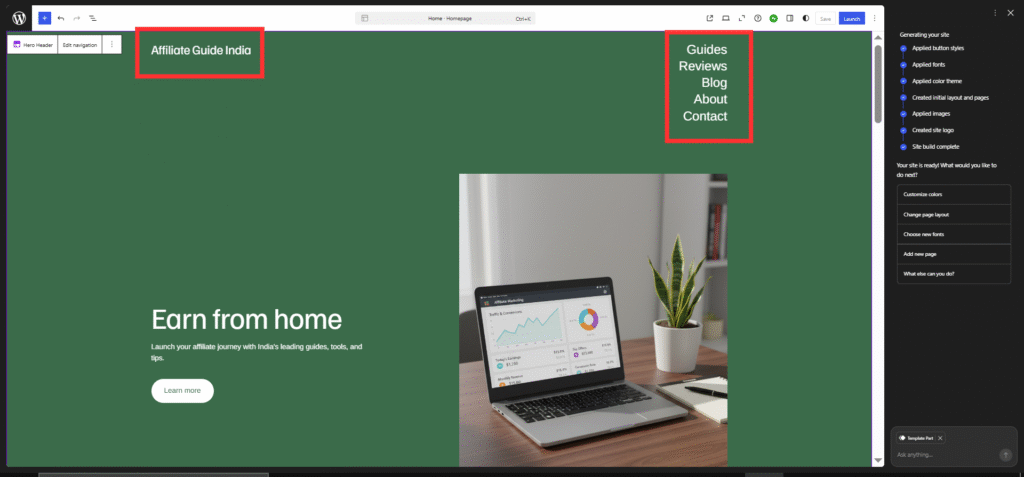
In just a short time, the basic website is ready. I can already scroll through it and see how it looks.
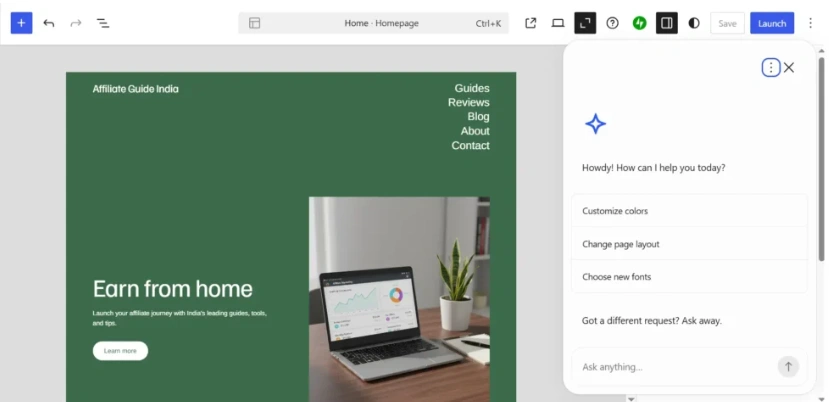
Perfect! Our AI site is LIVE and looking great.
Here’s what you have now:
✅ Homepage: Hero with “Earn from home” + laptop image, navigation (Guides, Reviews, About, Contact)
✅ Green color scheme (we’ll fix colors next)
✅ “Launch” button in top right = site is in Coming Soon mode (only you can see it).
On the left, I see the site preview. On the right or in a sidebar, I see the AI chat that I will keep using to refine everything.
Step 5: Understand the Editor and AI Sidebar
Before I start editing, I take a moment to understand the interface.
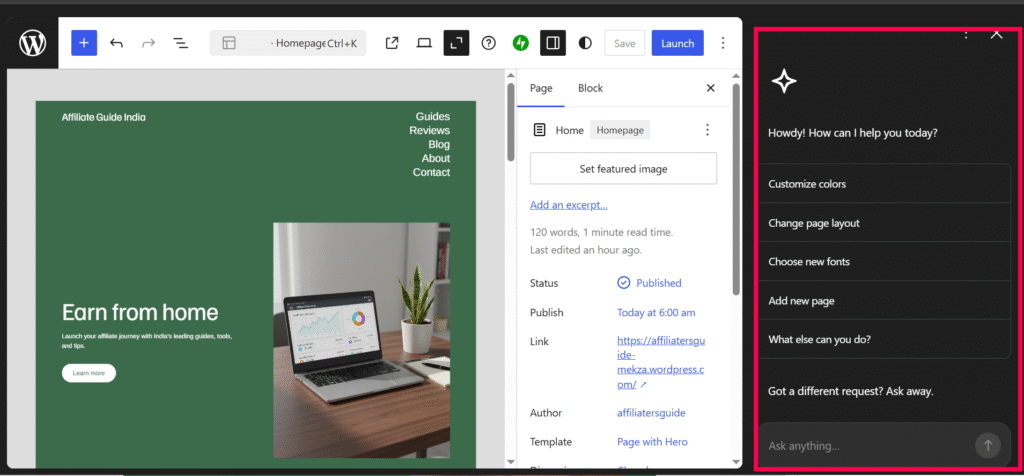
The AI assistant appears in a sidebar where I can type prompts to modify the page. I can ask it to rewrite text, add sections, change colors, or generate images.

If I click the three dots icon on the sidebar, I can switch the AI chat into a floating assistant.
If I close the sidebar and want it back, I simply click the star icon in the corner of the editor.
At the top right of the editor I see the Save button. I click Save whenever I make changes that I want to keep.
One important detail is that the AI builder uses a theme called Assembler. This theme supports the AI editing system and allows me to visually edit every part of the page.
Step 6: Use Good Prompts When Editing
Before you start editing different parts of the site, keep a few prompting tips in mind that will help the AI work better for you:
🎯 Be specific. Instead of saying “change the page”, say “change the headline in the Services section”.
🔎 Mention the exact section. Clearly point to the element you want to modify.
🗣️ Use simple language. Avoid technical jargon and keep instructions clear.
🎨 Describe the tone. You can ask for a friendly, professional, or casual style.
🧩 Break edits into small tasks. Update one section at a time instead of trying to change everything at once.
🔄 Try again if needed. If the result is not what you expected, simply rewrite the prompt more clearly.
💡 Ask the AI for ideas. For example: “What kind of images would fit this homepage?”
↩️ Remember you can undo changes. Use the back arrow at the top if you want to revert an edit.
With these tips in mind, you can start customizing the text, images, design, and structure of the website with confidence.
Step 7: Customize the Homepage
Now I begin improving the homepage.
The first section visitors see is the hero section, so I start there.
I click on the hero text and ask the AI to rewrite it.
Example prompt:
“Create a hero section for AffiliateGuide.in explaining how beginners in India can start earning with affiliate marketing.”
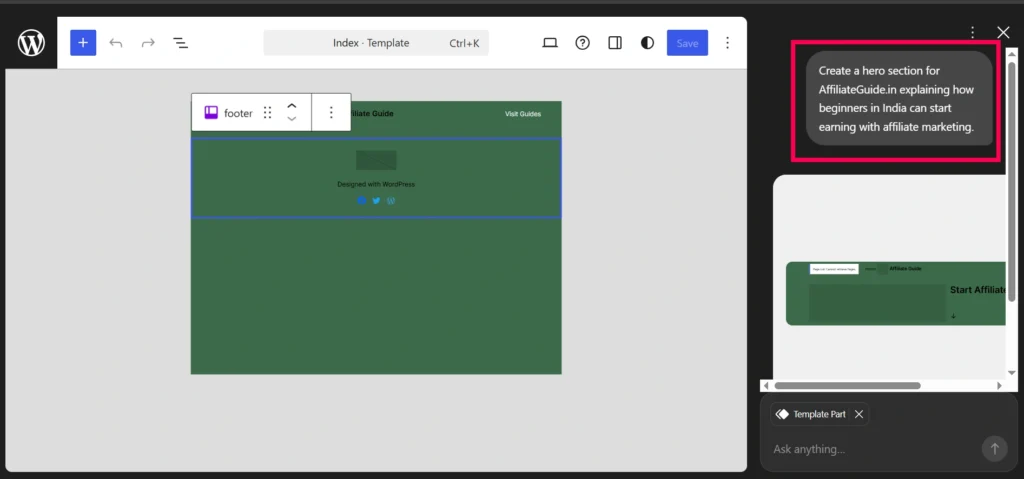
The AI generates a new headline and description that match the topic of the site.

Step 8: Launch the Website
When the site looks ready, I launch it.
At the top right of the editor I click the Launch button.
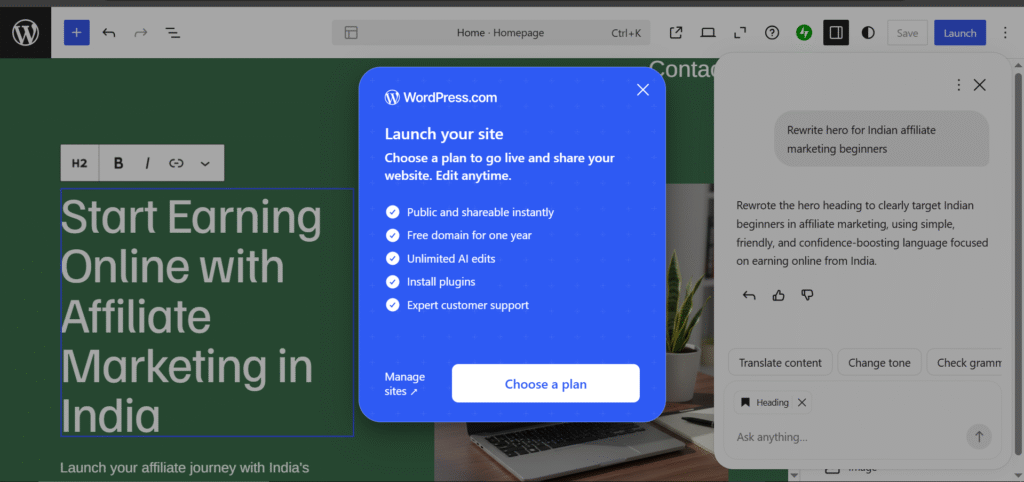
WordPress.com asks me to choose a plan because my AI site lives on the free subdomain affiliatersguide-mekza.wordpress.com. To use my custom domain affiliateguide.in, I need to upgrade first.
Step 9: Upgrade to Connect My Domain
Exact Steps to use my custom domain affiliateguide.in
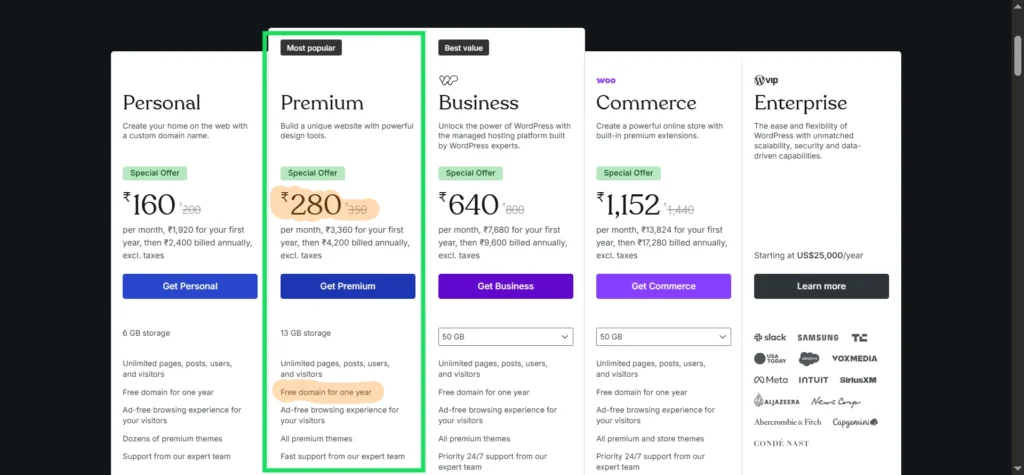
Step 1: Upgrade to Premium
- Click “Choose a plan” in the popup you showed
- Select Premium Annual (₹280/month billed yearly)
- ✅ Custom domain included FREE for 1 year or you can transfer your existing domain free of cost.
- ✅ No WordPress.com ads
- ✅ Premium themes/plugins
- Complete payment → Site unlocks immediately
Step 2: Map OR Transfer Your Domain
After upgrade, go to Dashboard → Upgrades → Domains
Option A: Map Existing Domain (Free, 5 mins setup)
- Click “Add a domain” → “Use a domain I own”
- Enter:
affiliateguide.in - Click Next → Select
- Copy DNS instructions
Option B: Transfer Domain to WordPress.com (₹0 first year)
- Click “Add a domain” → “Transfer domain”
- Enter:
affiliateguide.in - FREE transfer + 1 year renewal (saves ₹3,360)
- WordPress.com handles everything automatically
Option C: Get New Free Domain
- Premium plan includes FREE.com domain for 1 year
Step 3: DNS Setup (Only for Option A)
- Login to registrar (GoDaddy, BigRock, etc.)
- DNS Settings → Replace Nameservers:text
ns1.wordpress.com ns2.wordpress.com ns3.wordpress.com - Save → Wait 1-48 hours
Best for Indian Creators:
| Option | Cost Year 1 | Setup Time | Control |
|---|---|---|---|
| Transfer | ₹0 (save ₹3,360) | 5 mins auto | WordPress.com manages |
| Map | ₹0 + renewal | 5 mins + DNS | You control registrar |
| Free .com | ₹0 | Instant | WordPress.com manages |
Recommendation: Transfer = Most money saved + zero hassle
Step 4: Set Primary Domain
Back in WordPress.com: Domains → Make affiliateguide.in your Primary Domain
Done! https://affiliateguide.in = your AI site.
Step 10: Update and Finalize Images
Once my text looks good, I move on to the images.
10.1 Open the Site in the Editor
I make sure I am in the same editor view as before, with the AI sidebar visible. The process to reach this point is the same: Sites, My Home, then into the editor.
10.2 Replace Images with My Own
I start by replacing generic images with my own brand visuals or photos:
- I click on any image I want to replace, such as the hero image, a section image, or an image in a gallery.
- When I click it, a toolbar appears above the image. I click the Replace option.
- I choose one of these options:
- Open Media Library, if I want to use an image I already uploaded.
- Upload, if I want to upload a new image from my computer or phone.
- After I choose the image, the new picture appears in place of the old one.
I can also drag and drop images directly into the prompt box to upload them.
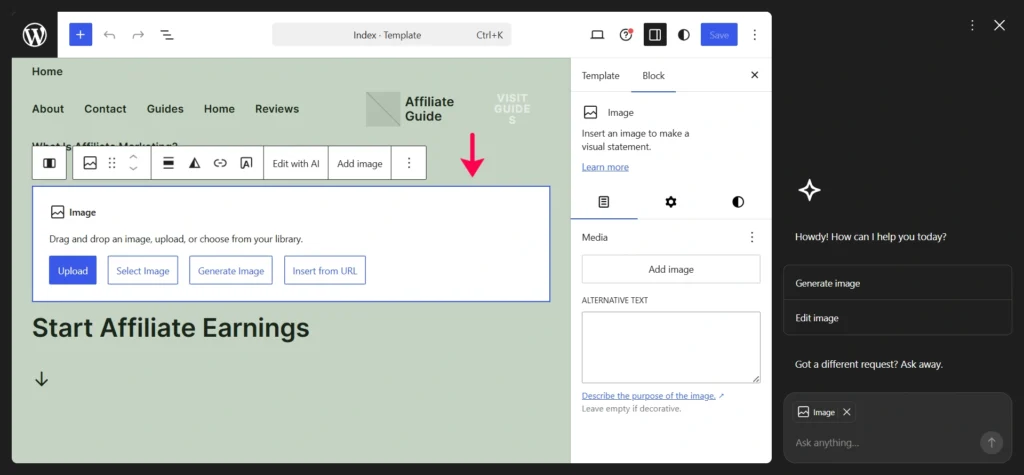
10.3 Generate New Images with AI
If I do not have a suitable image, I can ask the AI to generate one:
- I click on an existing image I want to replace or choose an empty area where I want to add a new image.
- In the AI prompt box, I type a description like:
- “Create an image.”
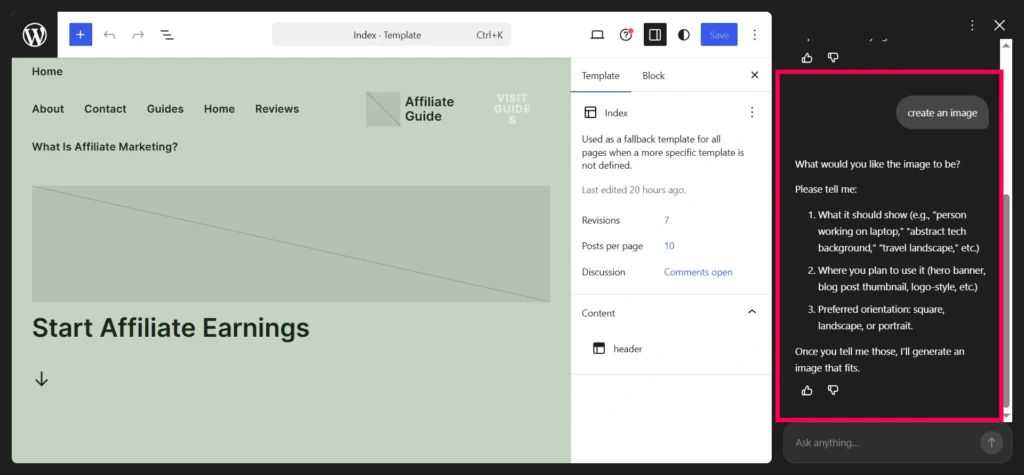
The assistant first clarified what I needed and prompted me with a few simple questions: what the image should show, where I planned to use it, and which orientation I preferred (square, landscape, or portrait). I replied that I wanted “a person working on a laptop” for a hero banner in a landscape format.
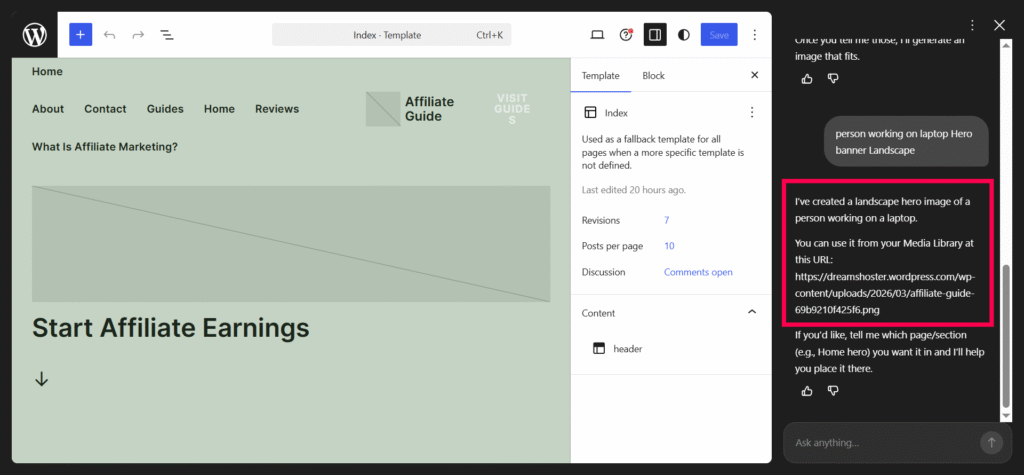
Based on that short description, the AI generated a new landscape hero image of a person working on a laptop and saved it directly into my Media Library.
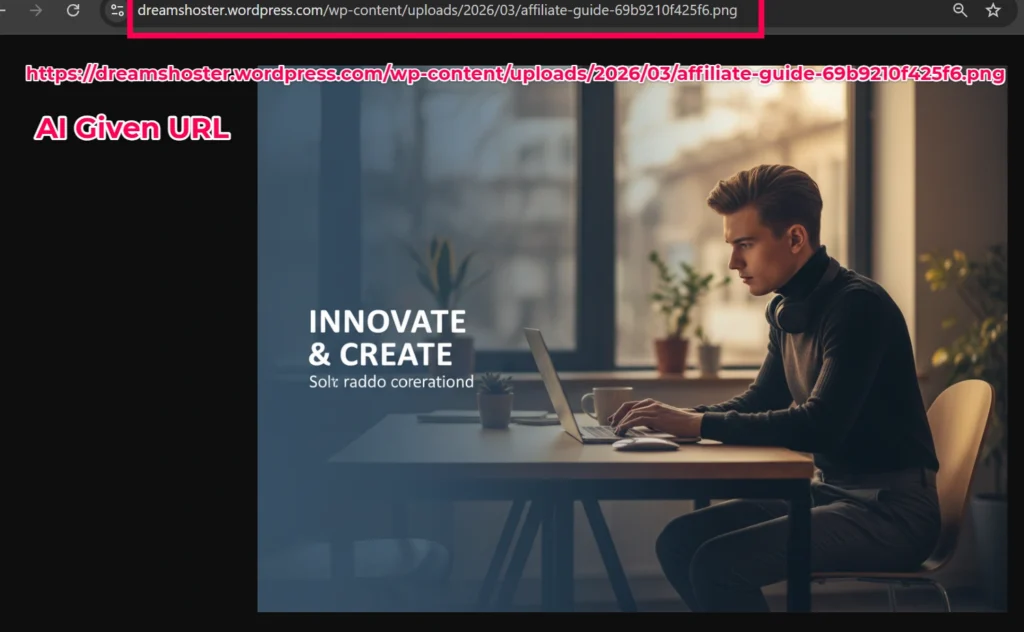
It even returned the exact media URL so I could reuse it later, and offered to help place the image into a specific section, such as the homepage hero, if I told it which page or block I wanted to update. It’s fun to see AI create exactly what sparks your interest!
10.4 Add Stock Photography
Sometimes I just want high quality stock photos. The AI can help with that as well:
- I click the image I want to replace, or I select a location where I want a new image.
- In the AI prompt box, I type something like:
- “Add a stock photo of a modern office scene to this section.”
- Just in secs AI created the image
- I review it and click Save if it fits.

10.5 Update the Site Logo
If I want to add or change my logo, I do this:
- I click on the header area where the logo is, or where I want it to appear.
- In the AI prompt box, I type something like:
- “Add a logo to the header.”
- AI generated the logo. I can accept the AI suggestion or choose to upload my own logo file.
- Once I am happy, I click Save to keep the change.
Step 11: Adjust Design and Layout with AI
Now I focus on the design, colors, sections, and layout.
11.1 Open the Site with AI Editing
Again, I open my site, click My Home, and enter the editor. If I have a paid plan, I go through Appearance, then Editor, and click the homepage preview.
11.2 Change the Overall Color Scheme
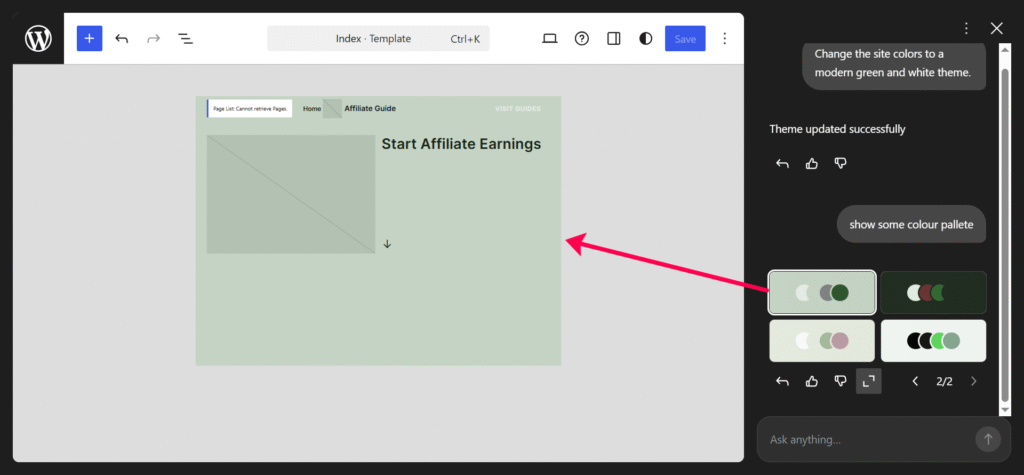
To change the overall color palette of the site with AI:
- In the AI prompt box, I type a request like “Change the entire site colors to a modern green and white theme.”
- The AI shows me several color palettes.
- I click on each palette to see how it looks on my site.
- When I find one that matches my brand or style, I click Save.
If I want to control colors manually and my plan allows it, I can go to Appearance, then Editor, then Styles, then Colors, and choose a new color palette there.
11.3 Change a Specific Color
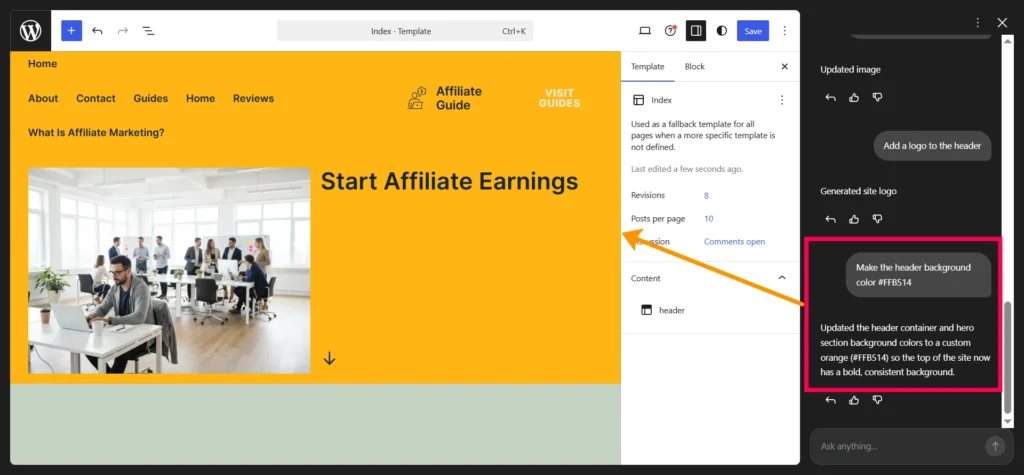
If I like the overall palette but want to tweak one element, I do this:
- I click the specific element I want to change. This could be a button, a header, a section background, or some text.
- In the AI prompt box, I type a precise request. For example:
- “Change this button to bright yellow.”
- “Make the header background color #FFB514.”
- The AI updates that element.
- I click Save if I like it, or undo if I want to try something else.
Step 12: Create Additional Pages
After the homepage is ready, I move on to creating the essential pages that make the website complete. A typical affiliate marketing website usually includes pages like Guides, Reviews, Blog, About, and Contact.
Instead of planning everything manually, I ask the AI assistant to help generate the structure and article ideas based on my niche.
In the AI sidebar, I type the following prompt:
Create a beginner guide explaining how affiliate marketing works in India.
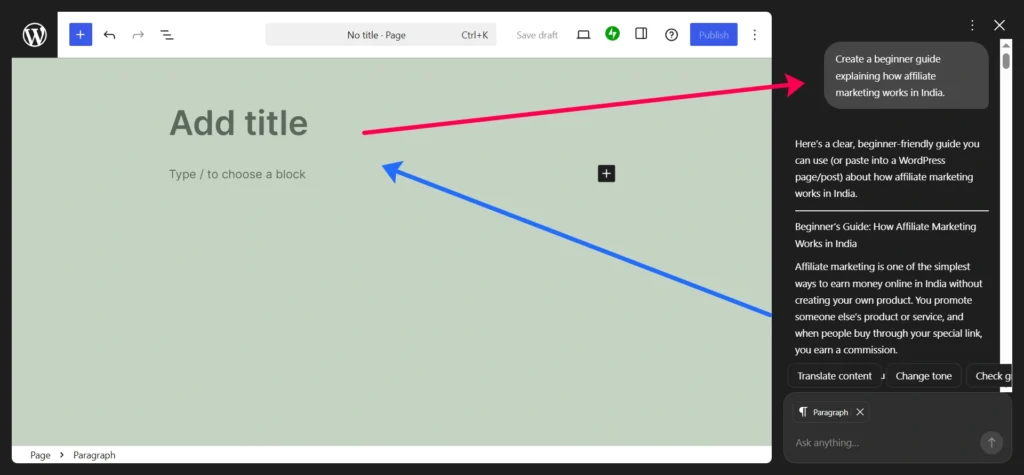
The AI suggests several helpful article topics that can become the foundation of the website. Here are some examples.
1. Start Earning Online with Affiliate Marketing in India
A beginner-friendly introduction explaining how affiliate marketing works and how people in India can start earning online step by step.
2. How to Choose the Best Affiliate Niche
Explains how beginners can select a profitable niche that matches their interests and audience demand.
3. Best Affiliate Programs for Beginners in India
A curated list of beginner-friendly affiliate programs including marketplaces, tools, and online platforms.
4. How to Build an Affiliate Website with WordPress
A practical tutorial showing how to set up a simple affiliate website using WordPress and basic tools.
5. How to Write Product Reviews That Generate Affiliate Sales
Tips on creating honest and helpful product reviews that attract readers and improve conversions.
These article ideas give the website a strong starting content plan. As the site grows, I can continue adding tutorials, reviews, and case studies that help readers learn affiliate marketing step by step.
Using AI for this process saves a lot of time because it quickly generates structured ideas that match the niche and audience of the website.
Step 13: Enable and Use AI Tools Across the Site
WordPress.com provides AI tools not just for the initial site creation, but also for ongoing content, image, and design work.
Here is how I make sure I use them fully:
- When I am editing a page or post, I look for the AI assistant icon at the bottom and click it whenever I want help writing or rewriting text.
- When I am editing images, I use the AI prompts to generate visuals or pull in stock photos.
- When I am adjusting the site layout or colors, I use the AI prompt box to request changes instead of hunting for every setting manually.
The AI tools can also answer general questions about running a site. For example, I can ask about optimizing images, improving performance, or basic security settings, and it will provide guidance right in the chat.
Step 14: Add Ecommerce Later if Needed
Right now, the AI Website Builder is focused on blogs, portfolios, and service based sites. If I need a full ecommerce store, the AI does not build the store functionality automatically yet. However, I can still do the following:
- After creating my site with AI, I can upgrade to a plan that supports plugins.
- I can install a plugin like WooCommerce from the dashboard.
- I can set up my products, cart, and checkout using WooCommerce tools.
So I use AI to get my main site design and content done quickly, and then I layer ecommerce features on top with plugins.
Who Should Try This
Perfect for beginners, solopreneurs, and creators who want a site fast without overwhelm. If you need custom ecommerce or apps, start here and scale later.
Try it yourself: WordPress.com AI Website Builder. Free to build, Premium plan to go live.
What do you think? Have you tried AI website building? Comment below!
Final Thoughts
In just a short amount of time, the WordPress.com AI Website Builder helped me go from a simple idea to a fully working website.
Instead of spending hours designing pages or writing layouts from scratch, I simply described what I wanted and let the AI generate the foundation.
From there, I customized the text, images, and pages until the site matched my vision.
For beginners who want to launch a website quickly without technical complexity, this tool makes the entire process much faster and easier.
🙏 Disclosure & Thank You
This post contains affiliate links to WordPress.com.
If you purchase through my links, I earn a small commission at no extra cost to you. Thank you for supporting us – DreamHosters.
Frequently Asked Questions About AI Website Builders
What exactly is an AI website builder?
AI website builders use machine learning trained on vast website datasets to suggest tailored layouts, text, and images from simple prompts. They handle initial drafts in minutes, unlike manual tools.
How does an AI website builder assist with designing a website?
AI creates custom graphics, edits images, suggests layouts, and optimizes for speed and devices based on your inputs. It ensures consistent branding and responsive designs without coding.
How is an AI website builder different from a traditional website builder?
AI builders generate full sites in 20 to 30 minutes with auto-content, while traditional ones take 8-12 hours of manual setup. AI offers less granular control initially but faster launches; traditional provides deeper customization.
How long does it usually take to create a website using AI?
Most AI builders produce a draft site in under 5 minutes after prompts, with basic customization adding 20-40 minutes total. Full launch can happen in 30 minutes or less.
Can you still customize the website after the AI generates it?
Yes, all major AI builders allow drag-and-drop edits to layouts, colors, fonts, and content post-generation. You retain full control via intuitive editors.
What types of websites can be created with an AI website builder?
You can build portfolios, business sites, blogs, landing pages, or ecommerce stores suited to any industry. Examples include restaurants, services, or online shops with AI-generated sections.
Is it possible to start building a website with WordPress.com AI for free?
Yes. When you use the AI website builder, you begin with a free trial that allows you to create the initial version of your website. To publish the site and access the full set of WordPress.com features, you will need to choose a Personal, Premium, or Business plan.
In my case, I chose the Premium annual plan to take the site live.
Are ecommerce websites supported by the AI builder?
At launch, the AI website builder is designed primarily for creating blogs, portfolios, and service-based websites. Ecommerce features are not included in the initial version, although future updates may expand its capabilities. If you need online store functionality, you can add it later by installing a plugin such as WooCommerce.
Can you use your own domain with an AI-generated website?
Yes. You can link a custom domain to your website so it uses a professional web address instead of a default one. A custom domain also helps strengthen your brand and makes your site easier to recognize.