
Contents
- 1 How to Install Plugins on WordPress.com Paid Plans – 2026
- 2 📌 TL;DR – The Myth That’s Costing You
- 3 What Plugins Actually Do
- 4 Before You Install a Plugin – Read This First
- 5 Who Can Install Plugins
- 6 Step 1: Sign In and Open Your Dashboard
- 7 Step 2: Find the Plugins Hub
- 8 Step 3: Search for What You Need
- 9 Step 4: Read the Plugin Details
- 10 Step 5: Check for Overlap
- 11 Step 6: Install and Activate
- 12 Step 7: Complete the Setup Wizard
- 13 Step 8: Find the Plugin Settings
- 14 Step 9: Test on Your Live Site
- 15 Step 10: Manage Plugins for the Long Term
- 16 How to Install a Premium Plugin (From WordPress.com Marketplace)
- 17 How to Upload a Plugin ZIP File
- 18 How to Install a Plugin via SFTP (Advanced)
- 19 WordPress.com Features You Get on Paid Plans
- 20 Common Beginner Mistakes to Avoid
- 21 Troubleshooting Guide
- 22 Why This Matters for Your Website
- 23 Your Next Step
- 24 🎬 Watch the Full Video Tutorial
- 25 Frequently Asked Questions
- 25.1 Can I install plugins on WordPress.com free plan?
- 25.2 Why don’t I see the Plugins menu in my dashboard?
- 25.3 How do I install plugins on WordPress.com step by step?
- 25.4 How many plugins can I install on WordPress.com?
- 25.5 Are WordPress.com plugins safe to use?
- 25.6 Can I use WooCommerce plugins on WordPress.com?
How to Install Plugins on WordPress.com Paid Plans – 2026
By Shanmugam | Published April, 2026 | WordPress Tutorials
📌 TL;DR – The Myth That’s Costing You
Old myth: “WordPress.com doesn’t allow plugins or themes.”
New truth: All paid WordPress.com plans now support 50,000+ plugins and thousands of themes. No upgrade to a higher tier required.
Many online reviews still spread the old story. That might be quietly costing you conversions and trust with your audience. Readers see those outdated claims and leave before they ever learn what’s changed.
But here’s the reality:
- Third-party plugins and themes are now available on every paid WordPress.com plan.
- That includes SEO tools, ecommerce extensions, performance plugins, and custom themes.
- No more Business plan requirement. Lower-tier paid plans work just fine.
So if you’ve been telling your audience that WordPress.com limits customization, stop. And if you’re ready to build a site that truly reflects your vision, now’s the time.
👉 Check your WordPress.com paid plan here and start using any plugin you want
Want to add a contact form, improve your SEO, or launch an online store? Plugins make it possible. And on WordPress.com paid plans, you can install them right from your dashboard. No coding required.
This guide walks you through every step. By the end, you’ll install your first plugin with total confidence.
What Plugins Actually Do
Think of plugins as apps for your website. Your phone comes with basic tools for calling and texting. When you need a fitness tracker or video editor, you download an app. Plugins work the same way.
They add features like:
- Contact forms so visitors can reach you
- SEO tools to help Google find your site
- Security layers to block hackers
- Backup systems to protect your data
- E-commerce features to sell products
On WordPress.com, plugin support is now available on every paid plan. That means you don’t need the most expensive tier to access thousands of plugins, Global Styles, font uploads, and CSS customization.
Before You Install a Plugin – Read This First
WordPress.com sites come with many features built right in. You might not need a plugin at all for common tasks.
Already included on every WordPress.com site (free or paid):
1. Security protection
2. Akismet anti‑spam
3. Basic SEO tools
4. Stats (like a simple Google Analytics)
5. CDN for faster loading
6. Contact forms
7. Email subscriptions
8. Commenting with likes and mentions
9. Galleries, slideshows, carousels
10. Payment buttons
11. Paid Content block (charge subscribers)
12. Social sharing buttons
13. Donations block
14. Exports and imports
15. Infinite scroll, related posts, likes
16. Embeds (YouTube, Twitter, etc.)
Extra features come with each paid plan:
Personal plan – Custom domain, SSL, install plugins, upload themes, audio/podcasts, custom code (JavaScript).
Premium plan – Everything in Personal, plus Google Analytics, WordAds, video uploads, CSS editor, appointment bookings.
Business plan – Everything above, plus automated backups, staging sites, SFTP/SSH/database access.
Commerce plan – All of the above, plus full ecommerce tools.
So before you search for a plugin, ask: Is this feature already built in? You might save yourself time and keep your site lean.
Who Can Install Plugins
Before you start, make sure you have the right setup. Plugins work on WordPress.com paid plans. If you’re on a free plan, the Plugins menu won’t appear.
Here’s your pre-installation checklist:
- You’re logged into the correct WordPress.com account
- You’ve selected the right website (if you manage multiple sites)
- Your paid plan is active
- You have Administrator access
If you manage several sites, double-check which one you’re on. Installing a plugin on the wrong site is an easy mistake to make.
Step 1: Sign In and Open Your Dashboard
Start by logging into your WordPress.com account. Once you’re in, look for the site you want to work on. Click it to open the dashboard.
👉 If you are a beginner and want to learn how to install a WordPress theme on WordPress.com, read this step-by-step guide .
Take a second to confirm the site name in the top left corner. This small habit saves headaches later. Plugins only live on the site where you install them.
👉 Want to build your site using the WordPress.com AI Website Builder? Read this complete step-by-step guide .
Step 2: Find the Plugins Hub
Look at the sidebar on the left. You’ll see a menu item labeled Plugins. Click it.
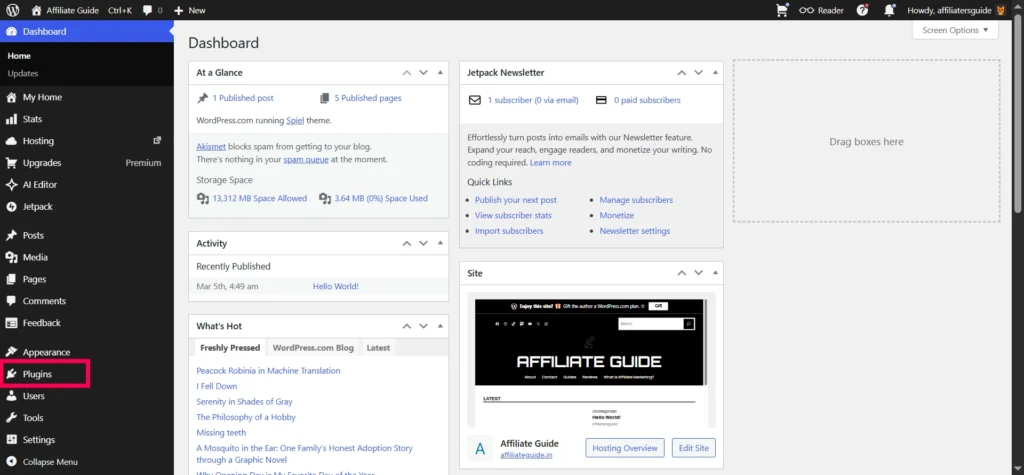
This is your command center. WordPress.com designed this screen to show popular plugins, but you can also search for exactly what you need. Any plugins you’ve already installed will appear here too.
If you don’t see the Plugins menu, check your plan level again. Only paid plans have access.
Step 3: Search for What You Need
The plugin directory has thousands of options. Don’t get overwhelmed. Use the search bar at the top.
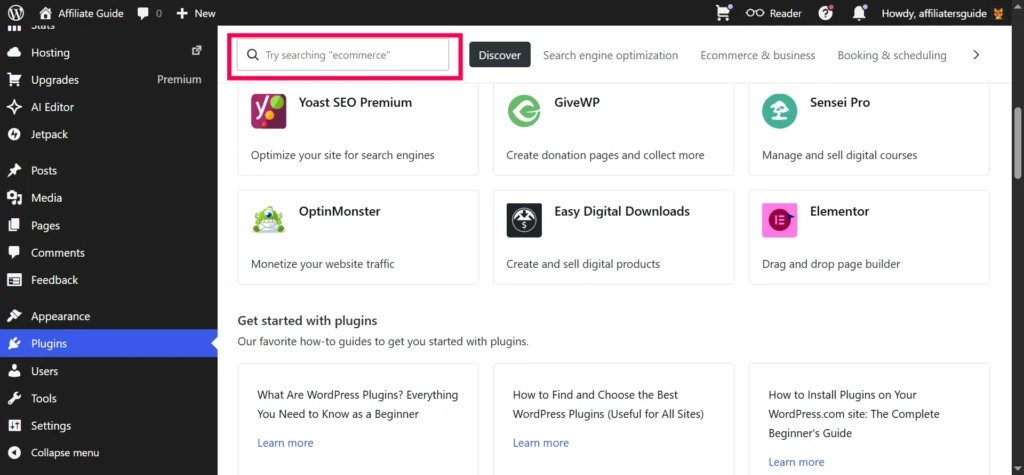
Don’t know a specific plugin name? Search by the job you want done:
- “Contact form” for communication tools
- “SEO” for search engine optimization
- “Backup” for data protection
- “Security” to block threats
- “Ecommerce” to sell products
This approach works every time. You don’t need to memorize plugin names.
Step 4: Read the Plugin Details
Click on any plugin in the search results. A details page will open. Never install a plugin based on the name alone.
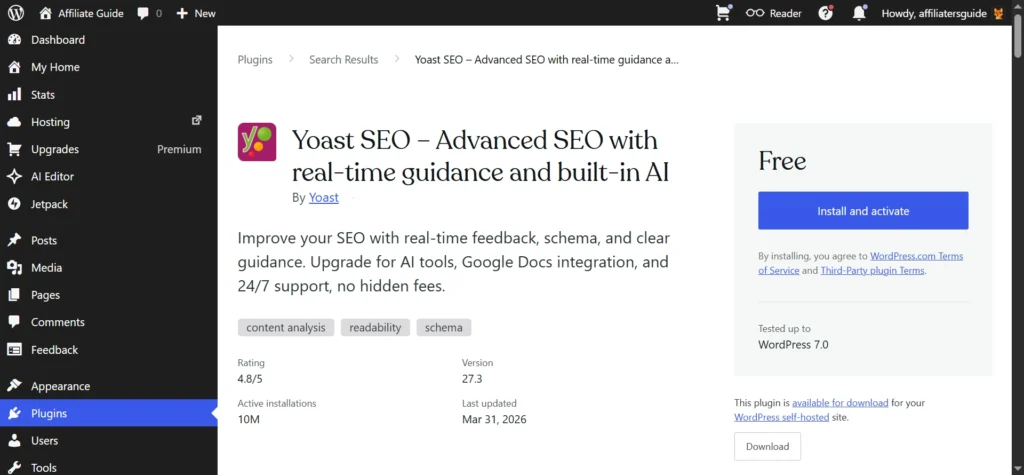
Look for these four things:
- Description – Does it actually solve your problem?
- Ratings – High ratings from many users signal quality
- Last updated – Recent updates mean active maintenance. Avoid plugins that haven’t been updated in over a year.
- Active installations – A high number indicates a popular, well-supported plugin.
If a plugin hasn’t been updated in a long time, skip it. It might not work with the latest version of WordPress.
Step 5: Check for Overlap
Beginners often think more plugins are better. That’s not true. Too many plugins can slow down your site or cause conflicts.
Before you click install, ask yourself:
1. Do I already have a plugin that does this?
2. Is this replacing something I already use?
3. Will this make my setup simpler or more complicated?
For example, WordPress.com includes Jetpack on many plans. Jetpack already offers social sharing, basic SEO, and contact forms. Installing a separate plugin for social sharing would be redundant.Choose one quality plugin over three small ones that do the same thing.
Step 6: Install and Activate
Found the right tool? Click the button labeled Install and activate.
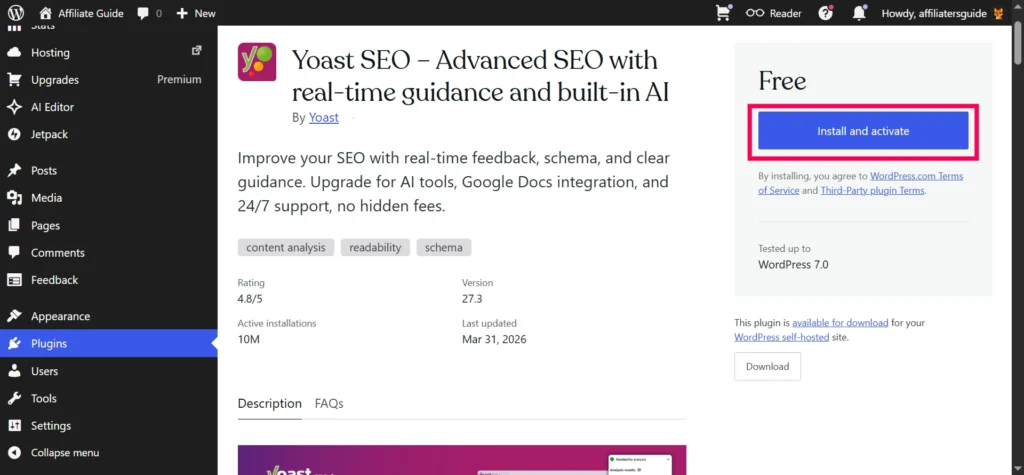
WordPress.com handles everything behind the scenes. The system downloads, installs, and prepares the files for you. The “activate” part is important. A plugin can be installed (files on your server) but inactive (features not running). This button does both jobs at once.
Once the process finishes, you’ll usually see a success message. Many plugins then redirect you to a setup page.
Step 7: Complete the Setup Wizard
Most modern plugins include a guided setup wizard. This is a series of simple questions about how you want the plugin to work.
For example:
- An SEO plugin might ask if your site represents a person or an organization
- A contact form plugin might ask where to send notification emails
- An ecommerce plugin might ask about your shipping location
Don’t skip these steps. Taking five minutes to follow the wizard prevents errors later. A bad setup can make a good plugin seem broken.
Step 8: Find the Plugin Settings
After activation, the plugin may appear in Plugins –> Installed Plugins
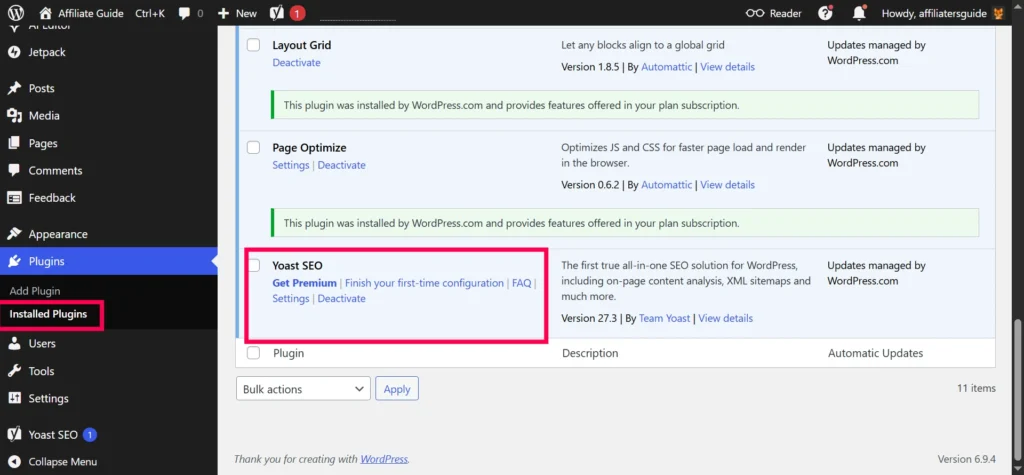
Click around. Most plugins work well right out of the box. But a few custom tweaks make the tool feel like part of your specific site.
Step 9: Test on Your Live Site
Never assume a plugin works just because it says “Active.” Always test on the front end (the part visitors see).
Here’s a simple testing checklist:
- Form plugins – Fill out your own form. Did you receive the email?
- Gallery plugins – Open on a mobile phone. Does it look good on a small screen?
- Speed plugins – Load your site in an incognito window. Does it feel faster?
- Ecommerce plugins – Place a test order. Is checkout smooth?
Testing catches small mistakes before they become bad experiences for your readers or customers.
Step 10: Manage Plugins for the Long Term
The Plugins page isn’t just for installation. It’s for ongoing maintenance. As your site grows, you’ll return here often.
Three management tasks you need to know:
- Updating – Developers release updates for bugs and security. WordPress.com often handles these automatically, but check occasionally.
- Deactivating – Temporarily turn off a plugin without deleting its settings.
- Deleting – Remove plugins you no longer use. This keeps your database clean and reduces security risks.
Set a reminder to review your plugins every few months. Delete anything you haven’t used.
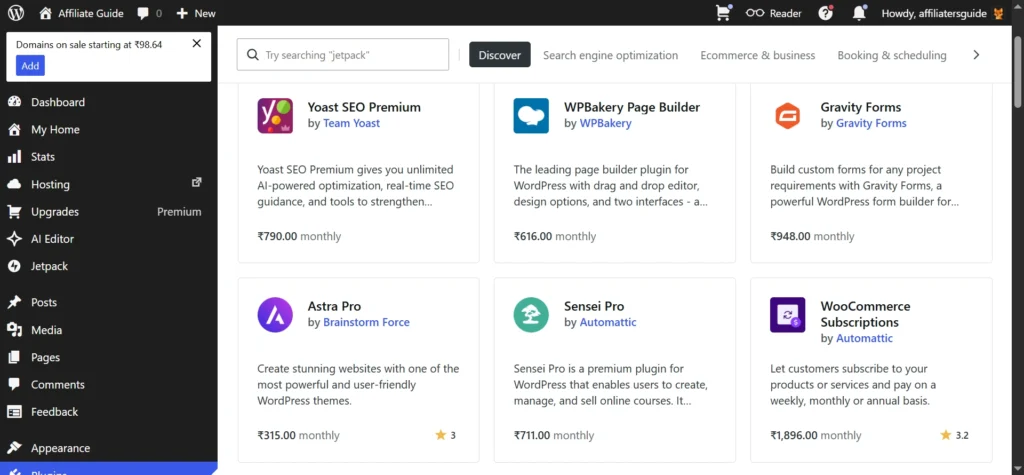
How to Install a Premium Plugin (From WordPress.com Marketplace)
WordPress.com highlights a selection of carefully chosen premium plugins on the Plugins page. Look for the “Browse all” link under “Must‑have premium plugins.”
To buy and install one:
- Visit your dashboard and click Plugins.
- Click on the premium plugin you want, or click “Browse all” to see all options.
- Click “Purchase and activate”.
- Choose monthly or yearly billing.
- Complete checkout.
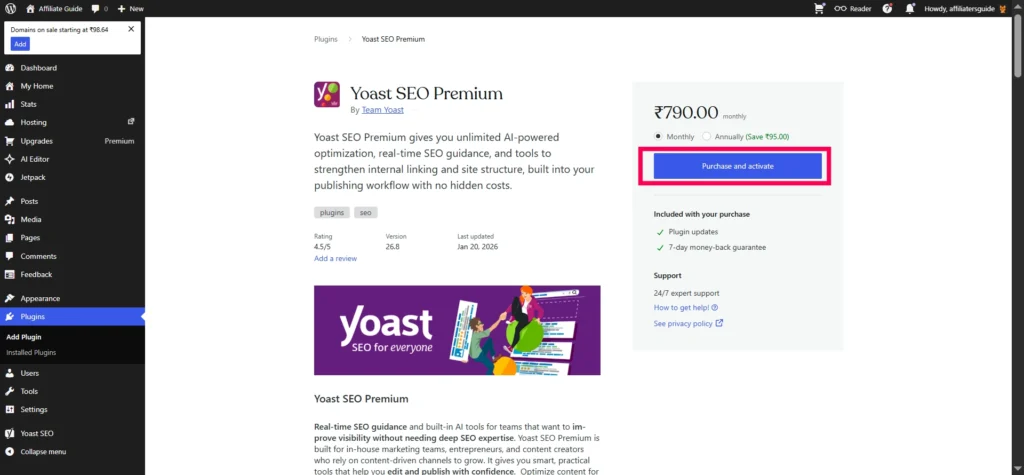
The plugin installs and activates automatically. You can manage all premium plugin subscriptions under Purchases in your account.
How to Upload a Plugin ZIP File
Sometimes you’ll buy a premium plugin from a third-party developer. They’ll give you a ZIP file instead of a directory listing.
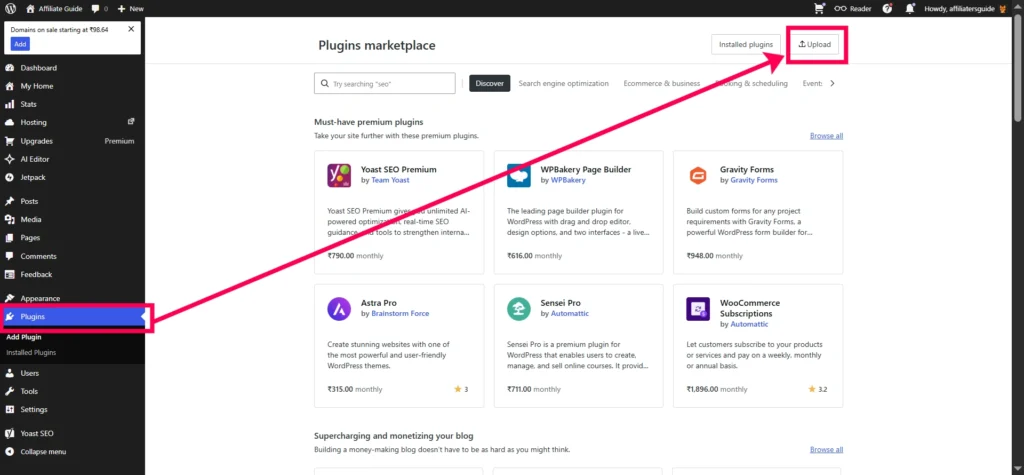
On paid WordPress.com plans, you can upload these files manually:
- Go to the Plugins area.
- Click the Upload button (top right corner).
- Choose the ZIP file from your computer. Do not unzip it.
- Click Install Now.
- Click Activate.
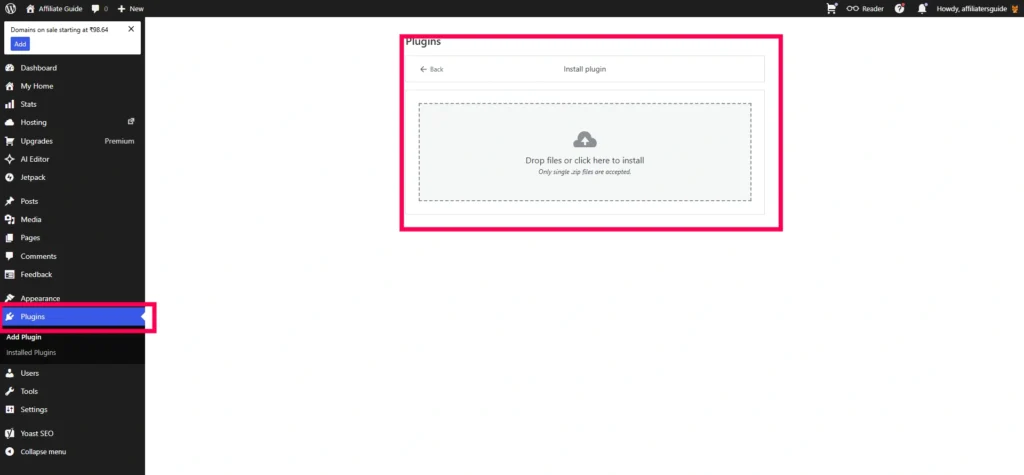
Important warning: Only upload files from trusted sources. A file from an unknown or “nulled” source could contain malicious code that harms your site.
How to Install a Plugin via SFTP (Advanced)
If you’re a developer, you can also install plugins using SFTP (Secure File Transfer Protocol). This requires a Business or Commerce plan.
The process:
- Connect to your site via SFTP (credentials are in your WordPress.com dashboard under Hosting Config).
- Upload the plugin folder to
/wp-content/plugins/. - Go back to your WordPress dashboard, find the plugin, and activate it.
Most beginners won’t need this. Stick with the search or upload method.
WordPress.com Features You Get on Paid Plans
Plugins are just one piece of the puzzle. Every paid WordPress.com plan now includes:
- 50,000+ plugins – Access to the full directory
- Global Styles – Change fonts, colors, and layouts site-wide
- Font uploads – Add custom typography
- CSS customization – Fine-tune every design detail
These features used to require higher-tier plans. Now they’re available on every paid plan. That’s a major shift for WordPress.com.
Common Beginner Mistakes to Avoid
Even with a simple dashboard, new users make predictable errors. Here’s what to watch for:
- Installing too many at once. Add one plugin, test it, then add another. This makes conflicts easier to trace.
- Not reading the description. Plugin names can be misleading. Always read what it actually does.
- Skipping configuration. Installing without setting up is like buying a TV and never plugging it in.
- Forgetting to test. Your live visitors will find problems you missed. Test first.
- Keeping unused plugins. Old, inactive plugins are security risks. Delete them.
Troubleshooting Guide
Something not working? Follow these steps in order:
- Check your plan – Has it expired or been downgraded? That disables plugin functionality.
- Verify activation – Go to Installed Plugins. Does it say “Deactivate” (meaning active) or “Activate” (meaning inactive)?
- Clear your cache – Your browser might show an old version. Clear cache or use an incognito window.
- Read the documentation – Most plugins have a “Help” or “Docs” link. Your problem has likely been solved before.
If a new plugin breaks your site layout, deactivate that plugin first. If the problem disappears, you’ve found the conflict.
Why This Matters for Your Website
Plugins unlock tools that would otherwise require expensive custom development. Full design control lets anyone build a site that looks and works exactly as intended.
These plugins cover almost every use case, including SEO, eCommerce, booking systems, security, and more. Best of all, you don’t need any additional upgrade, full plugin access is already included in your WordPress.com paid plan.
This is a timely story for bloggers, business owners, store builders, and developers alike. WordPress.com just made professional site building accessible to everyone.
Your Next Step
You now know exactly how to install plugins on WordPress.com paid plans. The process is simple: search, evaluate, install, configure, test.
Don’t overthink it. Pick one feature you want to add. Find a well-rated plugin. Follow the steps above. Your site will be more powerful in under ten minutes.
Ready to unlock powerful features for your website?
👉 Start Your WordPress.com Plan NowGet access to advanced plugins, customization, and more
🙏 Disclosure & Thank You
This post contains affiliate links to WordPress.com.
If you purchase through my links, I earn a small commission at no extra cost to you. Thank you for supporting us – DreamHosters.
Frequently Asked Questions
Can I install plugins on WordPress.com free plan?
No. Plugin installation is only available on Business and Commerce plans. Free, Personal, and Premium plans do not include plugin access.
If the Plugins option is missing, you are likely on a lower plan. Upgrade to a Business or Commerce plan to unlock plugin installation.
How do I install plugins on WordPress.com step by step?
Go to your dashboard, click on “Plugins”, then “Add New Plugin”. Search for the plugin, click “Install”, and then “Activate”.
How many plugins can I install on WordPress.com?
There is no fixed limit, but installing too many plugins can affect performance. It’s best to use only the plugins you really need.
Are WordPress.com plugins safe to use?
Most plugins in the official library are safe, but always choose well-rated plugins, keep them updated, and avoid installing too many at once.
Can I use WooCommerce plugins on WordPress.com?
Yes. WooCommerce works on WordPress.com Commerce plans, allowing you to build a full eCommerce store with additional plugins for payments, shipping, and more.