
Contents
- 1 How to Customize Your WordPress.com Site with Global Styles and CSS – 2026
- 2 What Are Global Styles? (And Why You Need Them)
- 3 Accessing the Site Editor (Step by Step)
- 4 Customizing Typography Like a Pro
- 5 Mastering Colors and Palettes
- 6 Layout and Spacing: Giving Your Site Room to Breathe
- 6.1 The Font Library: Upload Your Own Fonts (No Code)
- 6.2 Why Upload Custom Fonts?
- 6.3 🪜 Step-by-Step: Upload Custom Fonts
- 6.4 Important Note
- 6.5 Variable Fonts: A Smart Performance Boost
- 6.6 🎯 Diving into Custom CSS (For That Final 10% Polish)
- 6.7 ⚙️ Accessing the CSS Editor
- 6.8 🧩 Three Essential CSS Snippets
- 6.9 🎯 Targeting Specific Blocks
- 6.10 📱 Responsive CSS (Mobile-First)
- 7 Pro vs Con: Design Freedom on WordPress.com
- 8 Real-World Case Study: Travel Blog Redesign
- 9 Performance and SEO Considerations
- 10 Troubleshooting Common Issues
- 11 Your Next Step: Build Something Beautiful
- 12 🎬 Watch the Full Video Tutorial
- 13 Global Styles FAQs
How to Customize Your WordPress.com Site with Global Styles and CSS – 2026
You don’t need to be a coding expert to build a stunning website. WordPress.com just made professional design tools available on every paid plan – Global Styles, font uploads, and full CSS control. No upgrade to a higher tier required.
👉 Want to build your site using the WordPress.com AI Website Builder? Read this complete step-by-step guide .
In this guide, you’ll learn how to transform your site from a generic template into a custom, brand‑perfect experience. We’ll cover:
- The power of Global Styles (site‑wide colors, typography, spacing)
- Uploading your own fonts with the Font Library
- Writing custom CSS for that final 10% of polish
- Real‑world examples and troubleshooting
You can fully customize your WordPress.com site using Global Styles, custom fonts, and CSS on any paid plan. Easily control colors, typography, layout, and add advanced styling without needing coding skills.
👉 Start your WordPress.com plan and unlock full design control
What Are Global Styles? (And Why You Need Them)
Think of Global Styles as your site’s master blueprint. Instead of changing the button color on every single page, you change it once in the Styles panel, and it updates everywhere. This saves hours of work and keeps your brand consistent.
Global Styles live inside the Site Editor – a true “what you see is what you get” (WYSIWYG) interface. You can adjust:
- Typography – Fonts, sizes, line heights for headings and body text
- Colors – Background, text, links, buttons, and accent palettes
- Layout – Content width, spacing between blocks, padding
- Blocks – Granular overrides for specific block types (e.g., all buttons have rounded corners)
On WordPress.com, Global Styles are available on Personal, Premium, Business, and Commerce plans. Free plan users can preview but need to upgrade to publish changes.
Accessing the Site Editor (Step by Step)
- Log in to your WordPress.com dashboard.
- In the left sidebar, go to Appearance → Editor.
- The Site Editor opens with a live preview of your homepage.
- Click the half‑circle / bi‑color icon in the top right corner – that’s the Styles panel.
- Alternatively, click Styles in the left sidebar.
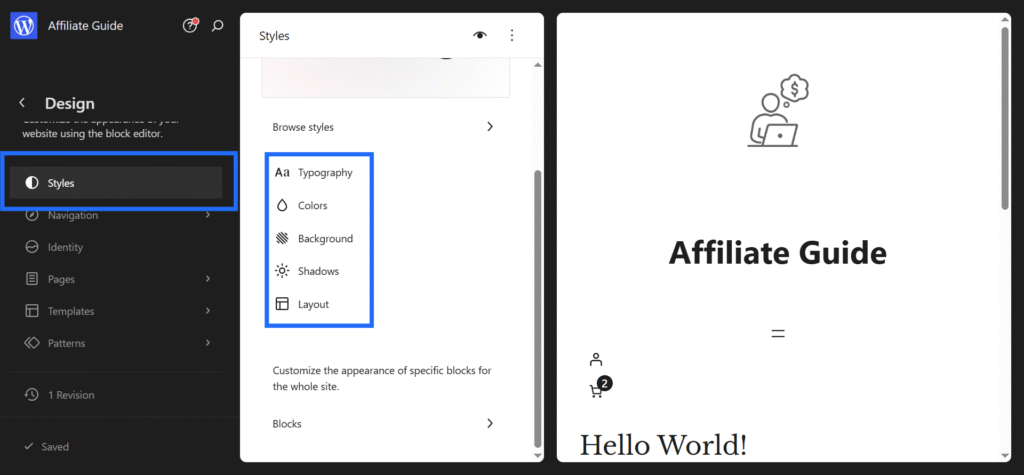
Now you’re in the design laboratory. You’ll see tabs for Typography, Colors, Background, Shadows, and Layouts. Click any tab to start customizing.
Customizing Typography Like a Pro
Typography is the voice of your website. Bad fonts = bad user experience. Good fonts = trust and readability.
Step 1: Set Your Base Font
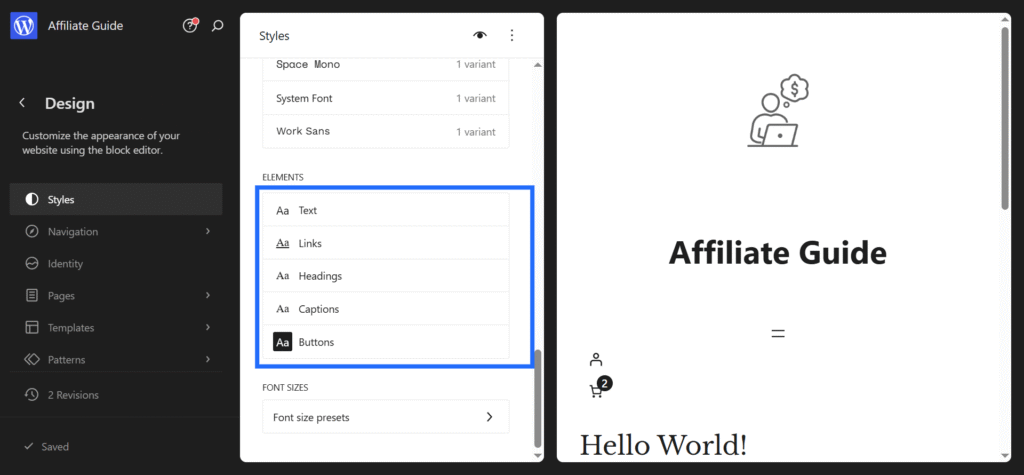
In the Styles panel, click Typography. You’ll see two main sections:
- Text – This controls body text (paragraphs, lists, etc.)
- Headings – Controls H1, H2, H3 down to H6.
Start with Text. Choose a font family from the dropdown – WordPress.com gives you access to hundreds of free Google Fonts, all hosted locally for privacy and speed. Popular choices:
- Inter – Clean, modern, highly readable
- Open Sans – Neutral and professional
- Lora – Elegant serif for long‑form articles
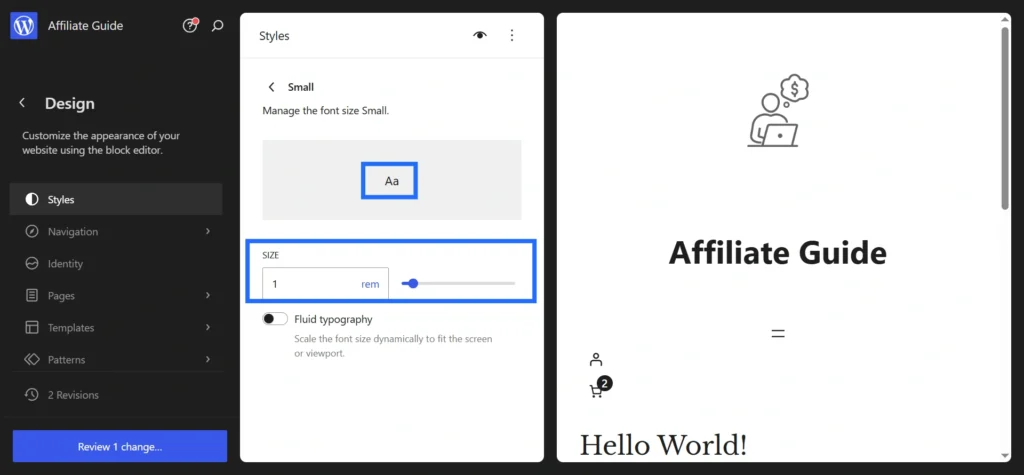
Set the font size – 16px or 1rem is standard for desktop. Set line height to 1.6 (that’s the space between lines of text). Too tight and it’s hard to read; too loose and it looks disconnected.
Step 2: Style Your Headings
Headings guide readers through your content. A good hierarchy looks like this:
- H1 (main title) – 48px, bold, maybe a serif font for personality
- H2 (section headers) – 32px, semi‑bold
- H3 (sub‑sections) – 24px, regular weight
You can set each heading level independently. Click the arrow next to Headings to expand and customize H1, H2, etc. separately.
👉 Get the best WordPress.com plan for your design project
Mastering Colors and Palettes
Color is the first thing visitors notice. A consistent palette makes your site look professional and trustworthy.
Building Your Core Palette
In the Styles panel, click Colors. You’ll see a set of swatches. By default, these come from your theme. You can replace them with your own brand colors.
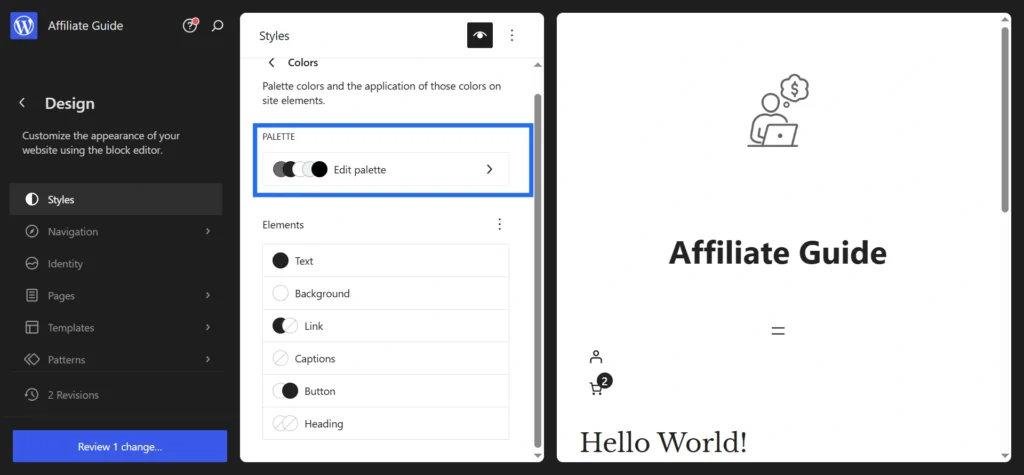
WordPress.com lets you define up to eight custom colors:
- Text – Main content text that should be easy to read with strong contrast against the background
- Background – The main canvas of your website, usually white or a light color
- Link – Clickable text or elements that take users to another page or section
- Captions – Small descriptive text used under images or media
- Buttons – Interactive elements users click to take action, like “Read More” or “Buy Now”
- Heading – Titles and section headings that structure your content and improve readability
Adding Custom Colors
To add a new color, click the “+” icon in the palette. You can choose a color using the picker or enter a hex code (for example, #4A90E2 for a clean blue).
Give your color a name like “Brand Blue” so you can easily reuse it across your site.
Accessibility: Contrast Checker
WordPress.com includes a built-in contrast checker. When you choose a text color, it alerts you if the contrast against the background does not meet WCAG guidelines (minimum 4.5:1 ratio for normal text).
This is important for accessibility, ensuring your content is readable for users with visual impairments. Good contrast also improves user experience and can support SEO.
Using Gradients
Solid colors are reliable, but gradients can add depth and a modern touch. In the Colors panel, select a color and switch from “Solid” to “Gradient.”
- Linear gradients
- Radial gradients
Example:
linear-gradient(135deg, #4A90E2 0%, #8E44AD 100%)
Gradients work best on buttons, backgrounds, or hero sections to make your design more engaging.
Layout and Spacing: Giving Your Site Room to Breathe
The difference between an amateur and a pro design is often white space (also called negative space). Cramped layouts feel cheap. Generous spacing feels premium.
In the Styles panel, click Layout. You can adjust:
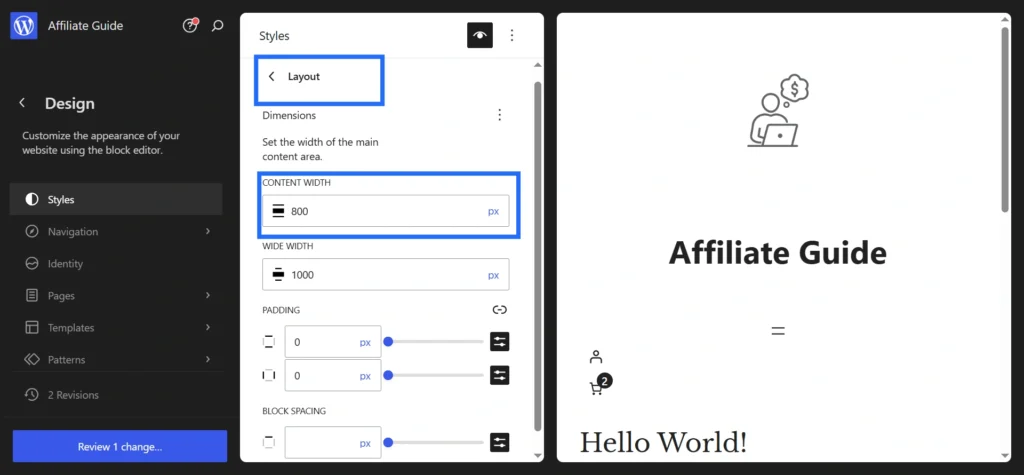
- Content width – The maximum width of your main content. For blogs, 800px is ideal for readability. For portfolios, 1200px works well.
- Block gap – The space between blocks. Start with 1.5rem and increase if your site feels crowded.
- Padding – Space inside containers (like a group block).
Use the Style Book to see how your spacing changes affect every block. Toggle between desktop, tablet, and mobile views using the icons at the top of the editor.
The Font Library: Upload Your Own Fonts (No Code)
Earlier, WordPress.com users depended on Google Fonts or theme-based font options. Now, on Business and Commerce plans, you can upload custom fonts directly using the Font Library inside the Site Editor.
Why Upload Custom Fonts?
- Brand consistency – Use your exact brand or corporate typeface
- Unique design – Stand out from sites using common fonts
- Performance – Self-hosted fonts reduce reliance on third-party services
🪜 Step-by-Step: Upload Custom Fonts
- Open the Site Editor
- Go to Styles → Typography
- Click the font management (globe) icon
- Open the Upload tab
-
Drag and drop your font file:
- Recommended:
.woff2(best performance) - Also supported:
.woff,.ttf,.otf
- Recommended:
- Enter a Font Family Name
- Click Upload
- Go back to Typography and select your new font
Important Note
Only upload fonts you are licensed to use. Google Fonts are free and safe, while premium fonts usually require a valid web license.
Variable Fonts: A Smart Performance Boost
Traditional fonts require multiple files (regular, bold, italic), which increases load requests. Variable fonts combine all styles into a single file.
- Adjust font weight smoothly (100–900)
- Reduce HTTP requests
- Improve performance without losing flexibility
🎯 Diving into Custom CSS (For That Final 10% Polish)
Global Styles cover most design needs. But sometimes you may want:
- Custom animations (like a gently pulsing button)
- Advanced hover effects
- Styling options not yet available in the Site Editor (such as sticky headers)
That’s where CSS comes in. On WordPress.com Premium, Business, and Commerce plans, you can safely add custom CSS to fine-tune your design.
⚙️ Accessing the CSS Editor
From the Site Editor:
Styles → Click the three dots (⋮) → Additional CSS
Classic method:
Dashboard → Appearance → Customize → Additional CSS
The editor provides a live preview. If something looks wrong, simply remove the code to revert.
🧩 Three Essential CSS Snippets
1. Smooth Scrolling
html {
    scroll-behavior: smooth;
}
2. Button Hover Effect
.wp-block-button__link {
    transition: transform 0.2s ease, box-shadow 0.2s ease;
}
.wp-block-button__link:hover {
    transform: translateY(-3px);
    box-shadow: 0 6px 12px rgba(0,0,0,0.1);
}
3. Rounded Images
.wp-block-image img {
    border-radius: 12px;
}
🎯 Targeting Specific Blocks
Each block has its own class name. Use Inspect (right-click → Inspect) to find it.
- Paragraph →
.wp-block-paragraph - Button →
.wp-block-button - Cover →
.wp-block-cover
.wp-block-quote {
    border-left: 4px solid #4A90E2;
    background: #f9f9f9;
    padding: 1.5rem;
}
📱 Responsive CSS (Mobile-First)
/* Mobile (default) */
.content-area {
    padding: 1rem;
}

/* Tablet */
@media (min-width: 768px) {
    .content-area {
        padding: 2rem;
    }
}

/* Desktop */
@media (min-width: 1024px) {
    .content-area {
        padding: 3rem;
    }
}
Pro vs Con: Design Freedom on WordPress.com
Pros
- Global Styles simplify design
Control colors, fonts, spacing, and layout from one place without touching code. - Custom fonts without plugins
The Font Library lets you upload and use your own fonts easily. - Stable custom CSS
Your CSS is stored separately, so it remains intact even after WordPress updates. - All-in-one design system
Everything is built into WordPress.com, so you do not need extra plugins.
Cons
- Some tweaks still need CSS
Advanced or niche styling requires custom CSS, available from Premium plans and above. - Font uploads are limited by plan
Custom font uploads are only available on Business and Commerce plans. Lower plans still offer a wide range of Google Fonts. - Limited direct theme editing
You cannot edit theme files likeheader.php. However, Full Site Editing reduces the need for this. - Theme switching can reset styles
Some Global Style settings may change when switching themes. It is best to back up your CSS before making changes.
Real-World Case Study: Travel Blog Redesign
Here is a practical example of redesigning a site using only WordPress.com tools.
Before
- Generic theme
- Default blue links
- Arial font
- Tight, cluttered layout
After (Using This Workflow)
- Global Styles
Headings set to Lora for an elegant feel
Body text set to Open Sans for readability
Primary color updated to warm orange#E67E22
Background changed to soft off-white#FDF9F4 - Layout Improvements
Content width set to 1000px
Block spacing increased to 2rem
Added more padding to header - Font Library
Uploaded a custom handwritten font for the site title (Business plan feature) - CSS Enhancements
Added hover lift effect to post cards
Applied rounded hover effects to images
Result
A fast, clean, and visually unique travel blog that feels custom-built.
Total time: 90 minutes. No developer required.
Performance and SEO Considerations
Good design should not slow down your site. WordPress.com already handles CDN, caching, and image optimization, but you can improve further:
- Limit font usage
Use a maximum of two fonts. Variable fonts are even more efficient. - Keep your color palette simple
Stick to 5–6 core colors to avoid unnecessary CSS bloat. - Test performance regularly
Use tools like Google PageSpeed Insights and aim for a score above 90 on mobile. - Write efficient CSS
Avoid generic selectors like: div { margin: 0; } Instead, use: .entry-content p { margin-bottom: 1rem; }
Better design improves user experience, which can lead to lower bounce rates and higher engagement — both important for SEO.
Troubleshooting Common Issues
- Custom font not showing
Check your plan (Business+ required), clear cache, and ensure.woff2format. - CSS changes not visible
Wait a few minutes or check in incognito mode due to caching. - Styles reset after theme switch
Some settings are theme-dependent. Always back up your CSS. - Mobile layout issues
Use media queries and test with browser dev tools. - Contrast warnings
Adjust colors to meet accessibility standards. Do not ignore these warnings.
Your Next Step: Build Something Beautiful
You now have everything needed to turn a basic WordPress.com site into a professional, brand-focused experience.
Simple Workflow Recap
- Upgrade to a paid plan (Personal, Premium, Business, or Commerce)
- Open Site Editor → Styles
- Set colors, typography, and layout
- Upload custom fonts (Business+)
- Add CSS for advanced styling (Premium+)
- Test on mobile and desktop
- Publish and refine
WordPress.com is no longer limited. It is a powerful design platform when used correctly.
👉 Start your WordPress.com plan today and unlock full design control
🙏 Disclosure & Thank You
This post contains affiliate links to WordPress.com.
If you purchase through my links, I earn a small commission at no extra cost to you. Thank you for supporting us – DreamHosters
Global Styles FAQs
1. Do I need coding knowledge to customize my WordPress.com site?
No, you can fully customize your site using Global Styles without any coding. CSS is only needed if you want advanced design tweaks.
2. Are Global Styles available on all WordPress.com plans?
Global Styles are available on all paid plans, including Personal, Premium, Business, and Commerce. Free plans can preview but not publish changes.
3. Can I upload custom fonts on WordPress.com?
Yes, but custom font uploads are available only on Business and Commerce plans. Other plans still offer a wide range of built-in fonts.
4. Where can I add custom CSS in WordPress.com?
You can add CSS from the Site Editor under Styles → Additional CSS or through Appearance → Customize → Additional CSS.
5. Will my design changes affect mobile devices?
Yes, but WordPress.com allows you to preview and adjust your design for mobile, tablet, and desktop to ensure a responsive layout.